
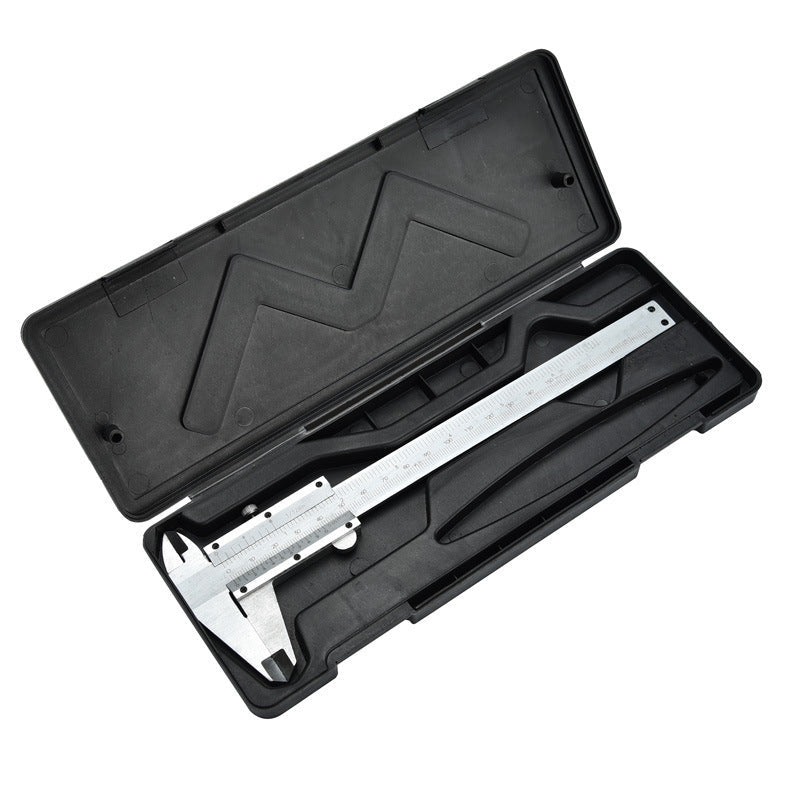
How to Use a Vernier Caliper: The Complete Beginner-to-Pro Guide
If you have ever tried to measure a small part with a ruler and ended up with three slightly different numbers, you already know why the vernier caliper exists. It was designed to solve exactly that problem: getting a precise, repeatable measurement without needing a lab full of equipment.
Whether you are a student learning measurement fundamentals, an electrician checking wire diameter, a woodworker fitting joints, or an engineer verifying tolerances on a machined part, a vernier caliper is one of the few tools that belongs in every serious toolbox. It is affordable, portable, and far more accurate than anything with a tape measure or ruled edge.
This guide walks through everything you need to know: what a vernier caliper is, how each part works, how to read the scale correctly, common mistakes beginners make, and how to choose the right one for your work. By the end, you will be able to pick up a caliper and take a confident, accurate reading on your first try.
What is a Vernier Caliper?
A vernier caliper is a hand-held precision measuring instrument used to measure the distance between two opposite sides of an object. Unlike a standard ruler, which only allows you to estimate between marked lines, a vernier caliper uses two scales working together, a fixed main scale and a sliding vernier scale, to let you read measurements down to a fraction of a millimeter or a thousandth of an inch.
The tool takes its name from Pierre Vernier, the French mathematician who developed the sliding scale system in the 17th century. That same basic principle is still used today in manual calipers, even though digital and dial versions have since joined the market.
What makes the vernier caliper genuinely useful is its versatility. A single tool can measure:
- External dimensions, such as the outside diameter of a rod or the thickness of a plate
- Internal dimensions, such as the inside diameter of a pipe or a hole
- Depth, using the depth rod built into the end of the tool
- Step measurements, using the fine adjustment jaws on some models
This combination of functions in one compact instrument is exactly why vernier calipers remain a staple across engineering workshops, classrooms, and home garages, even in an age of digital tools.
Why Use a Vernier Caliper Instead of a Ruler?
A ruler is fine for rough measurements, but it has real limitations once precision matters. Parallax error, worn edges, and the inability to measure internal dimensions or depth all work against accuracy. A vernier caliper eliminates most of these problems by design.
| Feature | Ruler | Vernier Caliper |
|---|---|---|
| Typical accuracy | ±0.5 mm (best case, with good eyesight) | Down to 0.02–0.05 mm depending on the model |
| Measures internal diameters | No | Yes, using the internal jaws |
| Measures depth | Not reliably | Yes, using the depth rod |
| Risk of parallax error | High | Low, especially with practice |
| Repeatability between users | Poor | Good, once technique is learned |
The takeaway is simple: if the job only needs an approximate measurement, a ruler is fine. If the job needs a number you can trust for machining, quality control, or fitting parts together, a vernier caliper is the right instrument.
Applications of Vernier Calipers
Because a vernier caliper can measure external size, internal size, and depth from a single tool, it shows up across a wide range of trades and hobbiesm <a href=" https://trafficpeak.io ">Boost Your Website Traffic with TrafficPeak</a>.
- Mechanical engineering and machining: Checking part tolerances, verifying shaft diameters, and confirming that machined components meet drawing specifications.
- Electronics and electrical work: Measuring wire gauge, component lead spacing, connector sizes, and PCB thickness.
- Woodworking: Measuring dowel diameters, mortise and tenon fits, drill bit sizes, and hardware thickness for a snug joint.
- Jewelry making and small crafts: Measuring ring sizes, bead diameters, wire gauge, and clasp dimensions where a millimeter can make or break the fit.
- 3D printing and prototyping: Verifying filament diameter, checking printed part tolerances, and confirming that printed components will mate correctly with existing hardware.
- Automotive and DIY repair: Measuring brake pad thickness, bolt diameters, bearing dimensions, and gasket thickness.
- Education and training: A staple tool in physics, engineering, and technical education for teaching measurement precision and reading scales.
If your work ever involves the question "will this actually fit," a vernier caliper answers it faster and more reliably than any other basic hand tool.
Parts of a Vernier Caliper
Before learning how to take a measurement, it helps to know what you are holding. A typical manual vernier caliper has the following parts.
- External jaws: The larger, lower jaws used to measure the outside dimensions of an object, such as a rod diameter or block thickness.
- Internal jaws: The smaller, upper jaws used to measure the inside dimensions of an object, such as the diameter of a hole or pipe.
- Depth rod: A thin rod that extends from the end of the caliper as the jaws open, used to measure the depth of a hole, slot, or step.
- Main scale: The fixed scale engraved along the body of the caliper, marked in millimeters, centimeters, or inches depending on the model.
- Vernier scale: The sliding secondary scale that moves along the main scale. This is the scale that allows fine, sub-millimeter readings.
- Thumb slide: The ridged section used to slide the movable jaw smoothly along the main scale with one hand.
- Locking screw: A small screw that locks the sliding jaw in place once a measurement is taken, so the reading does not shift while you check it.
How Each Part Works
The main scale and vernier scale work as a pair. The main scale gives you the whole number portion of the measurement, similar to reading a ruler. The vernier scale, which slides alongside it, lets you read the fractional portion far more precisely than the eye could estimate on its own. Together they turn a simple sliding mechanism into a precision instrument.
The jaws are simply mirrored pairs: the outer, larger jaws close around an object from the outside, while the smaller, upper jaws are shaped to be inserted into a hole or opening and pushed outward until they touch the inner walls. The depth rod is mechanically linked to the sliding jaw, so as you open the caliper, the rod extends by the same distance, allowing you to measure depth using the same main and vernier scale reading.
How to Use a Vernier Caliper
Using a vernier caliper correctly comes down to a consistent process: clean the tool and the part, close the jaws fully to confirm a zero reading, take the measurement with light and even pressure, lock the reading, and read the scale carefully. Here is the full step-by-step process.
Step-by-Step Guide
- Clean the jaws and the workpiece. Dust, metal shavings, or grease between the jaws and the part will throw off your reading. Wipe both surfaces before you start.
- Check the zero reading. Close the jaws completely with nothing between them. The vernier scale's zero line should align exactly with the main scale's zero line. If it does not, note the offset, as you will need to account for it or have the tool recalibrated.
- Select the correct jaws for the measurement. Use the external jaws for outside dimensions, the internal jaws for inside dimensions, or the depth rod for depth measurements.
- Open the jaws and position the part. Slide the movable jaw using the thumb slide until the jaws sit against the object. For internal measurements, insert the jaws into the hole and open them until they contact the inner walls.
- Apply light, even pressure. Close the jaws until they just touch the surface of the part. Do not force the jaws, as excessive pressure will compress the material slightly and give you a false reading, especially on softer metals or plastics.
- Lock the measurement. Tighten the locking screw so the sliding jaw cannot move while you read the scale.
- Read the main scale first. Note the whole number value where the zero line of the vernier scale falls on the main scale.
- Read the vernier scale second. Find the line on the vernier scale that aligns most precisely with any line on the main scale. That value is your fractional measurement.
- Add the two values together. The main scale reading plus the vernier scale reading gives you the final, precise measurement.
- Release and reset. Loosen the locking screw, remove the part, and close the jaws again for the next measurement.
Illustrated Explanation
Reading a vernier scale is far easier to understand visually than in text alone, which is why most technical manuals pair the written steps above with a labeled diagram. If you are new to the tool, keep the diagram nearby during your first few measurements until the process becomes second nature.
Common Beginner Mistakes
Most reading errors come from a small number of repeatable mistakes. Watch for these:
- Applying too much pressure. Squeezing the jaws too tightly compresses the material and gives a smaller reading than the true dimension.
- Not checking zero first. Skipping the zero check means every reading you take will carry the same hidden error.
- Reading at an angle. Viewing the scale from the side introduces parallax error. Always look straight down at the scale.
- Measuring dirty or damaged surfaces. Debris on the jaws or the part changes the effective measurement.
- Confusing the internal and external jaws. Using the wrong jaw pair for the measurement type gives a meaningless number.
- Forgetting to lock the scale before reading. The sliding jaw can drift slightly if it is not locked, especially on longer measurements.
How to Read a Vernier Scale
This is the step that intimidates most beginners, but the logic behind it is straightforward once you break it down.
A standard metric vernier caliper has a main scale marked in millimeters, and a vernier scale with a set number of divisions, commonly 10, 20, or 50, depending on the model's precision. The vernier scale is slightly shorter than the equivalent length on the main scale, which is what allows it to produce fine sub-millimeter readings.
Here is the reading process broken into its two parts:
- Main scale reading: Look at where the "0" line of the vernier scale sits on the main scale. Read the whole millimeter value just before that line. For example, if the vernier zero sits just past the 24 mm mark, your main scale reading is 24 mm.
- Vernier scale reading: Now look along the vernier scale for the one line that lines up perfectly with any line on the main scale. Count how many divisions that line is from the vernier's zero. If your caliper has 20 divisions representing 1 mm, and the aligned line is the 6th division, that adds 0.30 mm (6 × 0.05 mm) to your reading.
- Final measurement: Add the two values together. In this example: 24 mm + 0.30 mm = 24.30 mm.
For imperial calipers, the same logic applies, but the main scale is read in inches and the vernier scale typically adds increments of 0.001 inch. Digital calipers remove this step entirely by displaying the final number on an LCD screen, which is part of their appeal for beginners.
The key habit to build is patience. Rushing the alignment step is where most reading errors happen. Take a moment, look for the single best-aligned line, and double check it before recording your number.
Digital vs Manual Vernier Caliper
Both digital and manual (dial-free, scale-based) vernier calipers measure the same way mechanically, but they differ in how the final reading is presented and in a few practical respects that matter depending on your work.
| Factor | Manual Vernier Caliper | Digital Caliper |
|---|---|---|
| Reading method | Aligning main and vernier scales by eye | Instant digital display |
| Battery dependency | None | Requires a working battery |
| Learning curve | Requires practice to read accurately | Minimal, reads directly |
| Durability in harsh environments | Generally more robust, no electronics | Sensitive to moisture, dust, and drops |
| Typical price point | Lower | Higher |
| Educational value | Teaches real measurement principles | Skips the underlying scale logic |
Manual vernier calipers, like the zinc alloy model available in the Sindyan Shop measuring and monitoring tools collection, remain popular for a reason. They never run out of battery, they hold up well in workshop conditions, and they force you to actually understand what you are measuring rather than just reading a number off a screen. For students and anyone learning measurement fundamentals, that difference matters.
How Accurate is a Vernier Caliper?
Accuracy depends on the specific caliper's design, but well-made manual vernier calipers commonly measure to within 0.02 to 0.05 mm, which is more than sufficient for the vast majority of workshop, hobby, and educational tasks. For comparison, that level of precision is roughly twenty times finer than what a standard ruler can reliably offer.
Real-world accuracy also depends heavily on the user. Even the best caliper will give inconsistent readings if the jaws are dirty, if too much pressure is applied, or if the scale is read at an angle. Technique and tool quality work together, and neither one alone guarantees an accurate result.
Tips for Better Accuracy
- Always zero the caliper before your first measurement of a session.
- Let the jaws close under their own light weight rather than pressing them shut.
- Take the measurement with the part at room temperature, since metal expands slightly when warm.
- Read the scale directly from above, not from an angle.
- Take two or three readings on the same spot and confirm they agree before recording the value.
- Store and handle the caliper carefully so the jaws stay straight and undamaged.
Maintenance Guide
A vernier caliper is a simple mechanical tool, but a little care goes a long way toward keeping its readings accurate for years.
- Wipe it down after every use. Metal filings, sawdust, and oil residue left on the jaws or scale can cause sticking or scratch the sliding surface over time.
- Avoid dropping it. A dropped caliper can bend the jaws slightly, which throws off every future measurement even if the damage is not visible to the eye.
- Keep it dry. Moisture can lead to corrosion on the scale and jaws, particularly on models without a protective coating.
- Do not force the sliding jaw. If the slide feels stiff, clean the rail rather than pushing harder.
- Periodically check the zero point. Close the jaws fully every so often and confirm the scale still reads zero.
Storage Tips
Always store your caliper closed, in its case, in a dry area away from direct sunlight and temperature swings. A dedicated carrying case, like the one included with many manual calipers, protects the jaws from impact and keeps dust off the scale between uses. Avoid tossing it loose into a toolbox drawer with heavier tools, since contact with other metal objects is one of the most common causes of bent jaws.
Buying Guide
How to Choose the Right Vernier Caliper
Not every caliper needs to be a high-end digital model. Consider the following before buying:
- Measurement range: A 0-150 mm range covers the vast majority of hobbyist, educational, and general workshop needs. Larger ranges exist for industrial applications but add bulk and cost.
- Build material: Zinc alloy and stainless steel are common choices. Zinc alloy calipers offer a strong, corrosion-resistant build at a lighter weight and more accessible price point, making them a practical choice for everyday use.
- Manual vs digital: If you want a tool that never depends on batteries, reads reliably in dusty or damp environments, and helps you actually understand measurement principles, a manual caliper is the better fit.
- Included case: A protective case is not just a nice extra. It directly affects how long your caliper stays accurate by keeping the jaws safe from knocks.
- Ease of reading the scale: Clear, well-engraved markings make a real difference, especially for beginners still learning to align the vernier scale.
Who Should Buy One?
A compact manual vernier caliper is a smart purchase for engineering and trade students who need to learn measurement fundamentals, hobbyists working on 3D printing, jewelry, or small mechanical projects, electricians and technicians who need quick, reliable field measurements, woodworkers fitting joints and hardware, and anyone who has ever been frustrated trying to get a precise number from a tape measure or ruler.
Recommended Product
If you are looking for a dependable manual caliper to start with, the Vernier Calliper – Manual Precision Measuring Tool from Sindyan Shop is built around exactly the fundamentals covered in this guide. It is constructed from zinc alloy with a 0-150 mm measuring range, giving you the external, internal, and depth measurement capability described above in one compact tool. The fine-tuned sliding scale and clearly engraved markings are designed to make accurate reading straightforward even for first-time users, and it comes with a carrying case to keep the jaws protected between uses.
It works well across the exact use cases this guide has covered, from checking a machined part's diameter to measuring bead sizes for jewelry work, without needing batteries or calibration software. For anyone building a home or workshop toolkit, it is a practical entry point into precision measurement, and it pairs naturally with the rest of the measuring and monitoring tools available at Sindyan Shop.
Frequently Asked Questions
What is a vernier caliper used for?
A vernier caliper is used to measure external dimensions, internal dimensions, and depth of an object with much greater precision than a ruler or tape measure. It is common in engineering, machining, woodworking, electronics, and any task where an accurate fit matters.
How do you read a vernier caliper step by step?
First read the whole number on the main scale where the vernier scale's zero line falls. Then find the single line on the vernier scale that best aligns with a line on the main scale, and use its position to determine the fractional value. Add the two numbers together for the final measurement.
What is the difference between a caliper and a vernier caliper?
"Caliper" is the general category of tool used to measure the distance between two points, which includes digital calipers, dial calipers, and vernier calipers. A vernier caliper specifically refers to the type that uses a sliding secondary scale, the vernier scale, to achieve fine, precise readings without electronics.
How accurate is a vernier caliper?
Most well-made manual vernier calipers measure accurately to within 0.02 to 0.05 mm, depending on the specific model and the number of divisions on the vernier scale. Proper technique, including a clean zero check and light, even pressure, plays a major role in achieving that level of accuracy in practice.
Can a vernier caliper measure inside diameter?
Yes. The smaller, upper jaws on a vernier caliper are specifically designed for internal measurements. Insert them into the hole or opening and expand the jaws until they contact the inner walls, then read the scale the same way you would for an external measurement.
Why is it called a vernier caliper?
It is named after Pierre Vernier, the French mathematician who invented the sliding scale mechanism in the 17th century that allows a coarse main scale and a fine secondary scale to work together for precise readings.
What is the smallest unit a vernier caliper can measure?
This depends on the number of divisions on the vernier scale. A common metric caliper with 20 divisions per centimeter can typically resolve measurements down to 0.05 mm, while some higher-division models resolve down to 0.02 mm.
How do you zero a vernier caliper?
Close the jaws completely with nothing between them and check that the zero line on the vernier scale aligns exactly with the zero line on the main scale. If they do not align, note the offset and account for it in your readings, or have the instrument recalibrated if the offset is significant.
Is a digital caliper more accurate than a manual vernier caliper?
Not necessarily. Both types share the same mechanical measuring principle and can achieve comparable levels of precision. Digital calipers are simply faster and easier to read, while manual vernier calipers avoid battery dependency and tend to hold up better in harsh workshop environments.
What can go wrong when using a vernier caliper incorrectly?
The most common issues are applying too much pressure on the jaws, which compresses the part and gives a falsely small reading, failing to check the zero point first, reading the scale from an angle, and using the wrong set of jaws for the type of measurement being taken.
Can beginners learn to use a vernier caliper easily?
Yes. While reading the vernier scale takes a little practice at first, most beginners become comfortable within a few measurements once they understand the two-step process of reading the main scale, then the vernier scale, and adding the values together.
What material is best for a vernier caliper?
Zinc alloy and stainless steel are the most common materials. Zinc alloy offers a strong, corrosion-resistant, and lightweight build at an accessible price, making it a practical choice for students, hobbyists, and everyday workshop use.
Conclusion
A vernier caliper is one of those tools that quietly upgrades the accuracy of everything you build, repair, or design. Once you understand how the main and vernier scales work together, taking a precise measurement becomes second nature, and you will notice ruler-based guesswork feels unreliable by comparison.
If you are ready to add this kind of precision to your own toolkit, the zinc alloy 0-150 mm Vernier Calliper from Sindyan Shop is a practical, budget-friendly place to start, built to handle everything from classroom exercises to real workshop work. Browse the full Measuring & Monitoring Tools collection to find the right precision tools for your next project.
0 comments